
After a night of heavy rain we have an inch of water in the drivers-side interior footwell!
I am posting this information with hope that it might help others who are experiencing the same problem I had. If you find it of good use, please drop me an email. Please read the disclaimer at the bottom of this document.
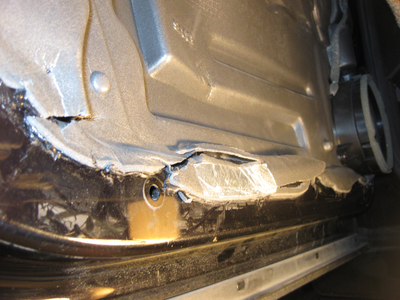
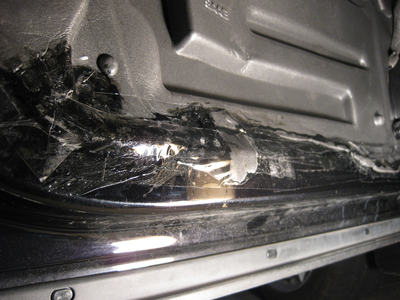
The 2007 Saab 93 door leak root cause. A torn foam-panel interior door seal.
Forward
In this article we illustrate a solution for a leaking interior door panel on a 2007 Saab 93 2.0t that was discovered in November of 2012.
Problem described:
We have had water leaking in on the driver’s side for several months, but only after a very heavy rain. On two occasions we had more than an inch of water accumulate!
Investigation
I ran a garden hose on the drivers side window for about 2 or 3 minutes and noticed that water was leaking into the interior at the very bottom of the plastic panel attached to the drivers door. The body door seal actually prevents the water from exiting at the bottom of the door opening so it leaks into the cabin and runs onto the carpet into the drivers foot area.
To investigate the root cause, I carefully separated the door panel from the door frame along the lower part of the door. I noticed that the foam seal panel inside the door was damaged, torn up and not connected (adhered to the metal door frame) as it should have been.
When did the damage occur? At the service dealer 2 years before!
This got me wondering, since we purchased the car used but still under factory warranty at the time it was purchased. I called the dealer service who confirmed that the car had service performed on the drivers door two years back to replace the window actuator. Apparently the service technician or mechanic, during replacement of the window actuator, had torn up the interior door seal and not bothered to replace or repair it properly. This interior door seal is a thin closed cell foam panel that tears easily when servicing the door mechanics. The panel is adhered to the lower part of the inside of the door and works to keep water moving towards the outside of the door cavity and properly through the drain holes at the bottom of the door.
The attending service manager claimed that the work on the door actuator was guaranteed for 1 year, so the fact that the interior door seal was damaged during that process is past due and there is nothing they can do about it–even though THEY damaged it in 2010. There was absolutely no way I could tell that the work was substandard without removing the door panel to see it inside the door assembly. So much for professional service and standing by your work. That will be the last time that service dealer gets my business.
Lesson for service done on a door
So to make a long story short: If you have ever had work done on the inside of a Saab door, it is imperative that the foam panel seal within the door assembly not be breached. If the seal is not attached properly or is damaged or torn in the repair process you may end up with a door that leaks into the cabin during heavy rains.
Perhaps after service door repairs, a good test at home would be to spray water on the door window for about 15 or 20 minutes to test the seal and make sure the service technician got the seal set up properly. Of course this could be done at the service dealer as part of the repair process to make sure the door handles water properly after service.
Saab design issue?
Looking at the Saab door design closely, it is clearly evident that the windows seam at the top of the door is located directly above the lower part of the interior door panel instead of the lower part of the door assembly. This means that any water entering the door-window seam and falling straight down will strike the foam panel and interior parts of the door before finding its way back to the door well drain holes. This particular choice of design makes it imperative that the foam door panel not be breached. I am not sure if this situation occurs in other sporty cars, like the Saab, which tend to have a tapered wider stance at the base of the vehicle when viewed from the front or back of the car. This does help make the car look more appealing and perhaps improves handling by distributing more mass at the base of the car–a lower center of gravity.
Repair or replace the part?
A new foam seal is ~$140 (USD). That is an insane amount of money for a simple piece of foam–typical service part highway robbery. I will take a stab at fixing it myself. I will use rubberized sealant and transparent box tape. It won’t look great, but who cares because the repair work will only be visible if you remove the interior door panel. If I ever have to tear out the panel for future repair work on a windows actuator I will consider buying a new foam panel–but not until then.
Repairing the foam seal.
Here are the steps I went through to repair the foam seal in the door. It was very easy and took only a few minutes…
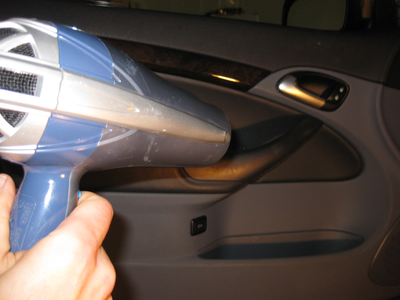
First we heat the door handle with a hair dryer. We want to get the plastic hot so it can flex more easily.
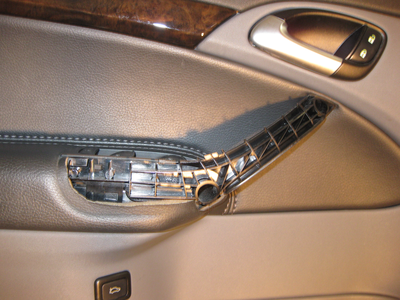
After the door handle has been warmed up, we can gently pull and easily snap off the plastic door handle cover.
Now we must remove two torx bolts which hold the door handle to the door frame.

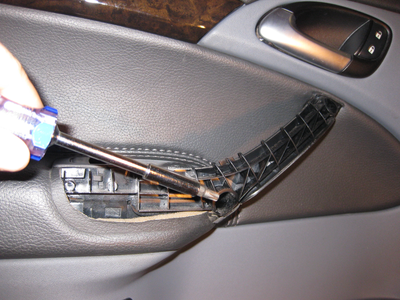
We then gently snap the door panel away and lift it gently to detach it from the door frame. We must be careful with the plastic snaps. The door panel remains loosely attached near the door lever. We can now inspect the the torn foam door seal.
Lifting the lower section of the torn foam seal exposes the interior cavity of the door. This is where the water is coming from. The water runs along the torn foam panel and drops onto the interior door panel. From there it enters the cabin.

We carefully use the rubberized sealant to repair the tear in the foam seal. We add quality transparent box tape to further mend any tears and spread the sealant across the tearing. It does not look like new, but it works just fine. The unsightly repair work will be covered completely when the interior door panel is snapped back into position.
Afterwards, a lengthy garden hose test reveals that the repair work did the job! The door no longer leaks into the interior of the cabin.
Summary
We successfully repaired the leaking door on the 2007 Saab 93 2.0t. The work took about one hour and we spent about $5. We saved at least $140 in the process and learned a few things along the way. All in all it was a big win-win. That is $5 and one hour of fussing around!
The solution has worked flawlessly for 18 months, including winter and now several torrential spring rains. We still have the option to replace the foam seal whenever we want to endure the $140 cost. I might consider, instead of cheap flimsy foam, using a custom fit piece of durable 4 or 6 mil plastic visquene.
If we had the service dealer fix it, we would have spent $140 for the part, and at least $90 for the labor. On top of that we would had to drive to the service dealer twice resulting in 2 hours of travel time–the dealer is 30 minutes away from my home. That is $230 and 2 hours of our time and travel costs.
Disclaimer:
The information provided here is not a suggestion or endorsement that anyone should attempt to perform the activities shown or described. This information is provided as-is to show how I solved the problem described. Any repairs you make to your car, or someone else’s car, are done at your own risk. The author assumes no responsibility or liability for the actions of others or the results obtained or problems encountered, including loss of any kind, from use of the information on this site.
In other words; You better know what you are doing before trying your own repair work. If you are unsure as to what you are doing, then seek out a qualified mechanic to perform the work.
