
Here we will describe how to set up Fedora 18 with KVM as a virtualization server and then use virt-manager to locally manage the VMs and other virtual resources.
Also we will describe how to set up a management host which would be used to remotely manage the Fedora virtualization server and hypervisor through ssh and virt-manager. The management host could be desktop system with Fedora installed on it.
What you will need
For the Fedora virtualization server, something like a Cicso UCS would be great if you can spare $15K or so.

Moving more towards the mid-range budget minded, an older Dell 2950 server might be just the ticket…

On the lower-end budget, a decent 64 bit multicore desktop system would work just fine as well.
A reliable server or desktop system with enough resources to accomodate the VMs you plan to create and run in the system.
An optional additional system to use as a client for management of the Fedora virtualization server, that is if you want to manage the Fedora virt server from a remote system.
A Fedora 18 64-bit Gnome desktop installation CD (or USB). You can get the raw image for the installation from the Fedora website. It is totally free to use and scale as you wish.
Some patience and willingness to learn some new skills.
Step 1 - Install Fedora into the server (10 minutes)
Perform a Fedora 18 64-bit Gnome Desktop intallation to the server hardware of choice. In my most recent case I installed Fedora 18 into a Dell 2950 with 8GB RAM and 170 GB of usable RAID storage–the perfect server for what I was needing to do at the time.
Boot the installation media in the server and proceed to install it using the installation prompt provided. It will eventually stop at the partioning tool. Make sure to affirm that you want to review the partioning during the installation. This will give you the chance to make some adjustments in the sizes and number of the partitions allotted to the Fedora installation process.
During installation, change the partitioning storage volumes. The installer default storage arrangement suggests most storage will be committed to “/home”. The problem with this is that KVM/QEMU images, by default, are created at “/var/lib/libvirt/images/.”. If you plan to have lots of virtual machine images and use the standard suggested partitioning, then it will be likely you will run out of space on the filesystem root partition “/” as you add more and more virtual machines.
There are a number options we can do to resolve the storage issue, while in the partitioning tool:
- We can rearrange the partitioning to provide a dedicated additional partition and assign mount point for “/var/lib/libvirt/” to this partition. -or-
- We can simply rearrange the standard partitioning such that most of the storage in at filesystem root “/” instead of “/home”.
I normally choose the latter of these two choices and commit most of the available storage to root filesystem (/). I reduce the /home partition to 30GB or so. There are other options as well, but we won’t get into them here.
After adjusting the partitioning as necessary, follow the Fedora CD live image installation process through to completion
Step 2 - Configure the Fedora Desktop (3 minutes)
In this section we log into the Fedora system for the first time and perform system configuration tasks.
Log into the Desktop using a display, keyboard, and mouse, attached to the server.
Configure the network to allow for remote management of the system. This requires that we setup a network interface that is not managed by Network Manager. Read on…
If your host will be static ip, then set that up. Use the network setting on the gnome network settings desktop interface. You can find it in system settings or directly from the network icon on the desktop. Otherwise just use DHCP (automatic settings) as is provided by default.
Now set the host interface to not be managed by network manager. We do this because we want any required interfaces to come up at boot time without having anyone logged into the host. Network manager activates network interfaces for users when they are logged in–not what we want for the server environment. We want network up and running right from the boot–even without a user logged in. We will need to edit the required network start script(s). For example: /etc/sysconfig/network-scripts/ifup-em1. Make sure the following entries are present in the script:
NM_CONTROLLED=no
ONBOOT=yes
Now enable the “non-network-manager” traditional networking scripting using the chkconfig utility. This allows network interfaces that are marked with “NM_CONTROLLED=no” to be able to be managed by the traditional Linux network scripting support.
chkconfig network on
chkconfig network start
We take the network control away from the Gnome network manager because we don’t want to require a desktop user to first login before the Fedora system tries to enable the network connection.
To easily view the runtime daemon configuration, perform the following command:
chkconfig
Install the ssh server…this will provide for remote management through virt-manager, ssh, and remote file management through scp. As root, perform the following:
yum install openssh-server
That should do it. The Fedora system should have the required networking running from boot–and also when nobody is logged into desktop on the server system. It will also work when users are logged in.
Step 3 - Completing the Fedora server installation general update of software and installation of KVM virtualization components (~ 5 min).
These commands can be done locally at the Fedora virtualization server or through ssh access from a remote system.
Perform a general update of the Fedora server. As root, or sudo…
yum update
Install the Virtualization group of rpm packages. As root…
yum groupinstall Virtualization
Install the libvirt daemon for qemu which provides for creation of KVM guest images on the host. Again, as root, or sudo…
yum install libvirt-daemon-qemu
Now we will restart the server to make sure all the required daemon services are running; libvirtd, etc. As root, or sudo…
init 6
Fedora virtualization system management from another host. (optional)
The Fedora server can be managed either locally or from a remote host. If you are not managing the server from a remote host, then you can skip this entire step.
For command line access you can use a secure shell
ssh user@host
For graphical use you can use X forwarding through ssh
ssh -X user@host
For file management and transfer between hosts you can use secure copy (scp) to transfer files. It is very easy to use and provides secure file transfer.
For example to start the gnome control at the managing system first attach a terminal ssh session with X forwarding:
ssh -X user@host
Then invoke the control center as follows:
gnome-control-center &
From there you can adjust various system settings at the remote host including the network, proxy, users, printers, etc.
Setting up the remote management host to manage the Fedora virtualization server with virt-manager. (~5 min)
If you are not using a remote management host, then you can skip this section.
This section assumes that we already have another Fedora or otherwise Linux host setup for management of the system we have outlined above. This host system requires the Virtualization group be already installed at the management host. We specifically need a local instance of virt-manager on the management host that we will use to add a connection to the the Fedora server KVM hypervisor through the libvirt daemon. All commands here are done from the local managing host.
Before we can add a remote hypervisor to virt-manager at the management host we need to make sure that the Fedora virt server has the public key of the management host added to the known hosts for root on Fedora virt server. We must first make sure there is a public/private key pair on the management host where we will run virt-manager. By default the two files are located at ~/.ssh/. and are “id_rsa”, “id_rsa.pub”. If they are not present we can generate them very easily using the ssh-keygen utility as follows (accepting defaults):
ssh-keygen -t rsa
If you decide to password (passphrase) protect the private key, you may need to run ssh-agent in order for the authentication to work. I normally do not password protect the private key, so have not yet used ssh-agent. If you are interested see the manpage for ssh-agent for more information on how to use it.
To allow virt-manager to connect to a remote host it is first necessary to add the public key from the management system to the allowed keys on each remote machine running libvirt. To add the public key to the list of allowed keys for the user root@host:
ssh-copy-id -i ~/.ssh/id_rsa.pub root@host
To start virt-manager and perform virtualization management. On the management host we can use the following command
sudo virt-manager
Virt-manager can also be started graphically from the search facility in the Fedora Gnome 3 desktop, or added to the favorites menu bar. It will challenge you for your sudo user password before starting.
In the virt-manager interface you will need to add a new connection to the Fedora virt server hypervisor.
“virt-manager -> File -> Add Connection”.
With the connection to the Fedora 18 virtualization server, we can now create new VMs, clone VMs, add Spice/VNC access to VMs, Delete VMs, manage storage, perform virtual network management, etc.. We can also completely manage, and use, the Fedora virtualization server from the management system–as briefly outlined in step 3 above.
When creating a network bridge in virt-manager, you may need to disable the spanning tree protocol (STP). Some managed switches will disable the physical port if your host uses STP on them. This is apparently a switch configuration–I ran into it in a network lab recently.
Running virt-manager directly on the Fedora virtualization server
If you are not managing the Fedora virt server from another system, then you will have to log into the server desktop and run virt-manager to perform virtualization management of the local hypervisor (KVM). Of course you will need a keyboard, mouse, and display attached because you will be using the server as a desktop system–in some cases this may not be feasible. Log into the desktop, open up a gnome-teminal session and enter the following command:
sudo virt-manager
When you first start virt-manager it looks rather simple, but don’t let that fool you. Virt-manager can perform some heavy lifting; VM management, virtual networking, storage, remote hypervisor management. Upon first start, virt-manager may need to be connected to the local hypervisor. To connect to the local hypervisor, use “File -> Add Connection”.
Of course you could occasionally manage the Fedora system from afar and occasionally manage it directly at the server. Either way, it’s your choice–very flexible.
Remote diagnosis - Monitoring IP traffic with wireshark-gnome.
This section explains how to add wireshark, which allows you to perform detailed network and device analysis, to the Fedora virtualization server. This is critical to have if you need to be able to monitor and analyze network data at the server. The commands shown can be run from the remote management host or directly at the Fedora virtualization server.
Log into the Fedora virt server system with ssh
ssh user@host

su

yum install wireshark-gnome
Now make sure that the “user” we want to allow to run wireshark is in the “wireshark” group.
usermod -a -G wireshark user
Use X forwarding to start wireshark at the remote host and view/control it at the managing system. “user” in this case the the same user we provided with the line above.
ssh -X user@host

wireshark &
Remote management of the Fedora 18 virtualization server - running desktop applications
There are lots of great tools to use to manage the Fedora virt server. Anything we run directly at the desktop on the Fedora server can also be run in view from the management host:
Log into remote host using ssh with X forwarding
ssh -X user@host
The following commands are examples of some of the programs that can be run from afar at the management host.
system-config-network

system-config-printer

gnome-control-center

wireshark-gnome
If you are using the gnome desktop proxy settings at Fedora server host and need to have the proxy environment variables set properly in a terminal session from the remote management system–say to run yum commands, or perform a wget; Just invoke a gnome terminal session from the active (ssh -X) session like so:
gnome-terminal
Which terminal session you run can make a big difference
Don’t forget; When you run a non-X11 ssh session to a remote Linux system you do not get the gnome environment enabled terminal session. You get a somewhat basic terminal session that is void of Gnome specific environment settings. If you want your terminal session to behave as if you were logged into Gnome–for proxy settings etc., then you need to use gnome-terminal.
My experience with the Fedora 18 virtualization server has been great.. The Dell 2950 server is performing very well and the stability of the overall system is incredible! Fedora rocks!
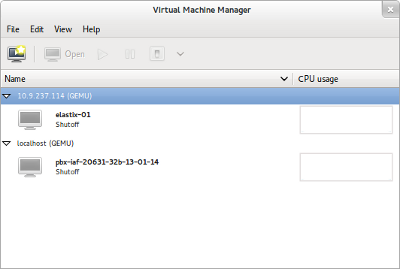
Here is a screenshot of virt-manager, running at the management host, connected to the Fedora virt server remote hypervisor
Here is the entire desktop at the management host. I have wireshark up and running as I monitor traffic from an Elastix PBX running in a VM within the Fedora virt server hypervisor. Click the image for a larger view.

A few points about creating VMs under virt-manager
If you use SPICE for the video connection channel to the VM you will get a very smooth and fast display experience when connecting to the VM (guest OS display). This is far better than the older bandwidth hog VNC. The SPICE protocol provides for highly compressed and accelerated video performance. It greatly reduces the required network bandwidth for remoting the VM to a SPICE client on remote host. In most cases a 1M bit connection is all you need for a perfectly responsive virtual desktop. It works so well that you don’t even realize you are running on a remote machine.
Spice USB forwarding provides the ability to add USB channels to the VM for USB plug-in forwarding on spice client connections. You can connected from a remote host to the VM guest, and then forward a USB device connection at the remote host to the guest VM. To do this you need to add a “USB Redirection” virtual device to the VM. You need to add as many USB Rediretion devices as you plan to have number of USB devices forwarded to the VM at one time. Each USB device forwarded takes up an available forwarding slot. I have had 10 USB devices forwarded to the VM guest at one time with no problems.
To take full advantage of KVM virtual devices and Spice, be sure to to add the virtio drivers to the guest VM. linux-kvm.org has virtio drivers for Windows available for free. Many of the modern Linux distibutions come with virtio drivers included, or available in the repositories for the Linux distribution.
When connecting the VMs to a network, you can use a virtual network device called the MacVTap. This is available using point and click with virt-manager. This is similar to a bridge, but easer to setup and use than a bridge. MacVTap is not only easier to use and setup than a bridge, but provides other benefits and more flexibility.
I typically use a separate network interface for use by the VM guests. The original network interface is used for server management, local users, etc. When creating the VM I typically use a MacVTAP to the dedicated NIC.
That’s all for now. Have fun with your new virtualization server!
