Linux Mint 17.1 Fully Automated Backup of KVM Hypervisor Client Virtual Machines and other Host Systems.
I recently spent some time researching open source backup solutions for KVM virtual machines (VMs) and discovered BackupPC. BackupPC is a server-based enterprise grade backup solution which can be used to backup data from various hosts including Windows Desktop/Server, Linux/UNIX, and OS X, or any other system that can have files collected across a network using common secure protocols for access, sharing, and/or transferring file system data.
By adding a pre-backup VM dump process and a post-backup cleanup process, we can safely and reliably dump and then backup virtual machines from a hypervisor client host. After the backup data has been transfered to the backuppc host we can then clean up the VM dump data to ready the dump area for the next backup operation. All of these operations are, of course, automated using BackupPC. We are currently backing up about 6.5TB worth of VM backups consisting of multiple full and multiple incremental backups. This is requiring only about 800GB of pool storage at the BackupPC host–a very efficient solution. We can restore a VM to any point in past history as defined in the configured backuppc schedule. Backups age off of the system automatically. In addition to automated full and incremental backups, a full or incremental backup can be manually initiated any time we wish.
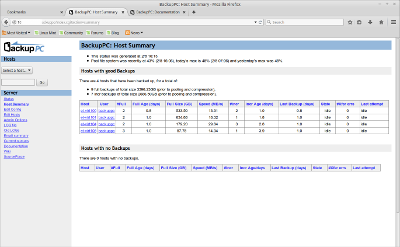
Below is a server client host summary view of the BackupPC UI. It shows the hypervisor clients currently registered as clients for backup operations.
The BackupPC server provides scheduled backups, both full and/or incremental backups, and a multitude of enterprise features such as backup aging, blackout periods, de-duped storage, etc. We can safely backup 5 TB to 10 TB of VM data within about 1TB of backup pool storage. It is very efficient. The solution has been working very well for several weeks, so far, with no problems at all.
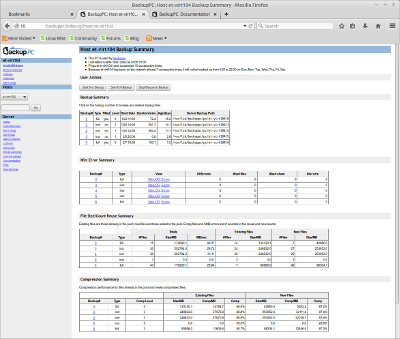
Below is a specific host client view summary for hypervisor client et-virt104.
Dumping VMs to Ready them for Backup
I spent some time with Daniel Berteaud’s virt-backup.pl script, but found that it was causing problems with libvirtd in CentOS 6 KVM hypervisors. It would hang libvirtd, requiring a restart. I spent a few days digging to find the root cause, but due to the time it was taking I decided to abandon the approach altogether. On a side note, I was able to get virt-backup.pl to function properly on a CentOS 7 KVM hypervisor to successfully dump the VMs, but did not test it enough to be able to recommend it.
Bash Script vm-clone-dump.sh for Hypervisor VM Dump and Cleanup
I decided to write a bash script that would be based on available command line utilities for managing VMs through libvirt. Focusing on simiplicity, I wrote vm-clone-dump.sh to use common libvirt tooling, virsh and virt-clone, for the required controlling and dumping of VMs. It is called vm-clone-dump.sh because it actually dumps a temporary clone of each VM along with XML definition of the clone and the XML definition of the original VM. The clone storage image is an exact duplicate of the orignal, which can be easily used to restore the original. To restore a VM:
Restore the virtual disk image and both XML files from the BackupPC server back to the virt-backup dump area of the hypervisow. This is easily done in the UI for BackupPC. Just select the host, select the backup, then checkbox the desired files from the backup and hit the restore button. The files will be restored to the configured dump directory on the hypervisor storage system. Large files, such as VM images may take some time to restore.
After the image(s) and XML files have been restored to the hypervisor, you would then make sure the VM is shutdown.
Copy the cloned backup image data over to the same filespec as the original VM in /var/lib/libvirt/images. You can tell exactly what the filespec is supposed to be by inspecting the original VM XML data.
In most cases there is no need to restore the XML data, unless perhaps it has changed since backup. A quick “diff” will tell you. The VM XML files for the hypervisor normally reside in /etc/libvirtd/qemu/. If you do change the VM XML, you will need to restart libvirtd to reload the VM XML files before you can use the new XML definition. A full hypervisor system restart is not necessary. Restarting libvirtd will not interrupt any currently running VMs at the hypervisor.
Finally you can start the restored VM.
Feel free to download the vm-clone-dump.sh script and use it in your KVM hypervisor. Invoke it with the -h option and it will produce help text on general dump processing and script usage.
The vm-clone-dump.sh script provides a “standard dump” and a “concurrent dump” processing option. Standard dump will pause all VMs while the dump operation takes place. Standard dump allows the hypervisor to spend the shortest amount of time dumping all of the VMs during the pre-backup processing, while all of the running VMs are paused. The tradeoff here is requiring all VMs to be paused, resulting in slightly more overall VM downtime. Concurrent dump will indvidually pause each VM, dump it, then resume it before going on to the next VM. Concurrent dump is meant to improve uptime for VMs during the hypervisor pre-backup dump operation at the expense of taking a bit more time to dump all of the VMs.
The dump operation will dump all running and/or shutdown VMs. It will not dump paused or transitional VMs. It will dump writable filesystems, but not dump read-only filesystems–such as mounted CDROM .iso images.
The hypervisor VM dump method chosen, standard or concurrent, is provided as a command option. The best use of it depends on the capabilities and loading of the hypervisor server storage system. I am finding that the standard dump method works best on older servers, such as the Dell 2950 (10K RPM SATA RAID storage), while the concurrent dump seems to work best on newer servers, such as the Cicso C220 M3 (solid state RAID storage). The Cisco C220 M3 server dumps VMs in a few short minutes (~10 minutes) while the older, aging, Dell 2950 takes far longer (~5 hours) to complete a similar VM dump–a dramatic difference indeed.
Linux Mint 17.1 Server Setup for Backup of KVM Hypervisor Client Virtual Machines and other Host Systems.
I decided to install backuppc into a Linux Mint desktop system which, in this particular case, functions as a great backup server. I chose the Linux Mint desktop distribution because it provides a super friendly graphical desktop, Cinnamon. The backuppc solution could be setup, as well, on Ubuntu or Debian and other Linux distributions as well. A stable version of backuppc was available for installation directly from the Linux Mint repositories and took literally seconds to install. Here are the general instructions for installing and setting up BackupPC on Linux Mint. Hopefully you will find them useful in building your own BackupPC envionment.
Once the BackupPC packages are installed and configured you can log into the backuppc website, either locally or remotely, to manage the BackupPC server. Add hosts, adjust the backup schedule, and let the backup automation begin! Run your hypervisor VMs with confidence in knowing that the VMs are being regularly backed up and can be easily restored as desired.


