
I am posting this information with hope that it might help others who are experiencing the same problem I am having with the E46 tail light assembly. If you find it of good use, please drop me an email to let me know. Please read the disclaimer at the bottom of this document.
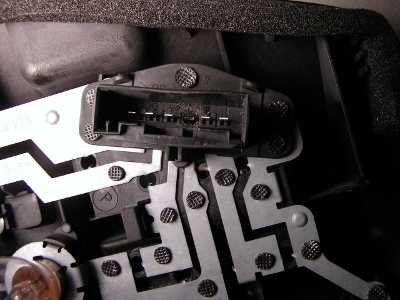
Can you spot the problem in this rear tail light connector?
Forward
My 18 year old son has been having problems with his 2001 BMW 325i. The body style is E46. The right tail light is not working properly. It is blinking too fast and does not seem to have enough illumination. It recently stopped working at all. I told him not to drive it until we had it repaired, so of course he has been quite anxious to get back to driving his car—he loves his BMW. He has been avoiding driving the “spare” family van, a rusty 94 Mercury Villager with a broken heater, broken AC, and 198,000 miles on it—can you blame him? Always up for a challenge and also for saving a buck or two, I decided to take a crack at fixing the BMW… :)
Problem described:
The right rear directional indicator, or turn signal, is very dim and flashes too quickly. Other lights within the same assembly are also very dim. The car keeps indicating a directional light warning on the dash panel. This problem went on for a couple of weeks and now, as of very recently, it has stopped working completely.
Possible solutions:
My first thought was that the problem might be with the light bulbs, so they were all checked and were found to be working perfectly. Next thought was that the problem could be a blown fuse. We checked the fuses, and they were ok as well. I started looking into replacement of the relay mechanism. The relay seems to be difficult to get to, so I went to the web for some information.
While searching around for information on the relay I was able to find out that there is a documented problem in the way the light assembly has been designed for this car. Although I am grateful for the author’s post on this, I believe this solution looks far more complicated than it needs to be. I solved it instead using one single wire connection back into the BMW 325i E46 wire harness.
The design problem appears to be in the material BMW chose for the ground return circuit in the tail light assembly, stamped steel sheathing. This material can not handle the ground return current. It basically gets too hot and eventually fries out at the thinnest point (least conductive) which happens to be within the connector contact area. I would not be suprised to find out that other BMW body styles have the same problem assuming that the folks at BMW might be using similar material selections on other vehicles.
Problem solved:
The solution I chose was to remove the ground return path from the connector and provide a much more conductive path using an external piece of 12 gauge stranded copper wire pulled from an old AC cord. Nothing beats copper wire for moving electrons. Ok, perhaps a super-conductor, but we aren’t going there today :)
The repair job took me about 40 minutes or so to complete–it took me far longer to write this article. The lights on the vehicle are now working perfectly!
Step by step what I did to solve the problem:
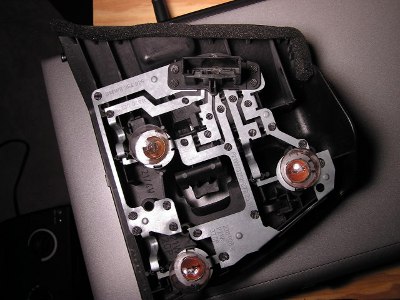
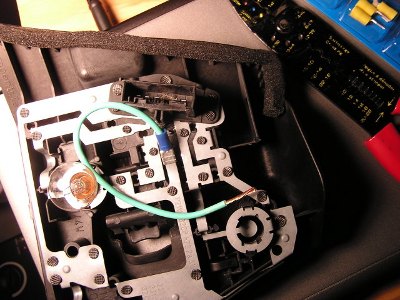
Below is a view of the 2001 BMW 325i E46 rear light assembly, once it has been removed from the trunk area.
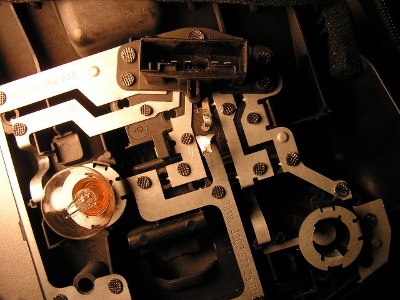
Notice the burnt-out conductor below. The third conductor from the right of the connector. It has basically melted and corroded away from the intense heat. –very poor choice of material in this case—shame on BMW for that one.
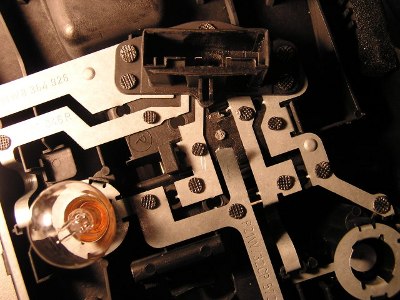
Below I have cut the bad conductor from the assembly using a pair of snub-nose wire clippers. You don’t want to leave the old unattached conductor in the assembly, it could short out one of the other conductors if it came loose.
Below I have removed the bad conductor from the connector assembly. I just pull it out from the bottom using a pair of needle-nose pliers. Notice also that I have raised and clipped the strip at the thicker area to ready it for a new slide-on connector…
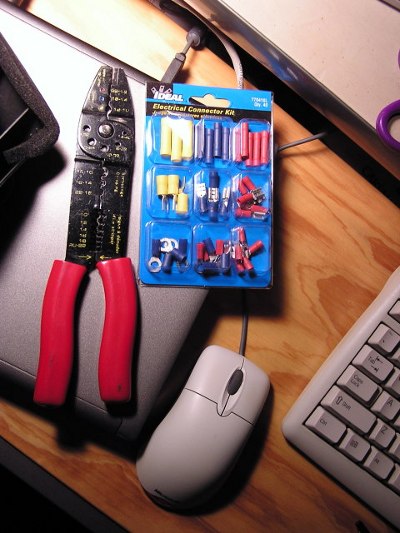
You will need some tooling for performing electircal crimping. This is very inexepensive equipment and can be found at your local hardware, electrical, or builders supply store, such as Lowes or Home Depot. I just happen to have this stuff in my repair box for situations like this. Below is a picture of the tooling I used for this job. There is also DELL laptop with mouse in the picture, but you won’t need either of those for this job. :)
Below I have used the crimping tool and a blue slide-on connector to attached a new ground lead to the thicker, more conductive part of the metal strip. The unit is now ready to take back and install into the vehicle. If you do this you must make sure that the wire you pick is of greater current carrying capacity than what is found in the wiring harness in the car. In my case I used 12 gauge stranded copper wire which is a considerable improvement in conductivity than to what BMW is using in the wire harness. 14 gauge stranded copper would be great also. I would not go any smaller than 14 gauge. This piece of 12 gauge was cut and pulled from an old extension cord lying around the house.
Now we are ready to install the light assembly unit back into the vehicle. Make sure all of the bulbs are inserted back into the assembly and take it back to the trunk of the vehicle.
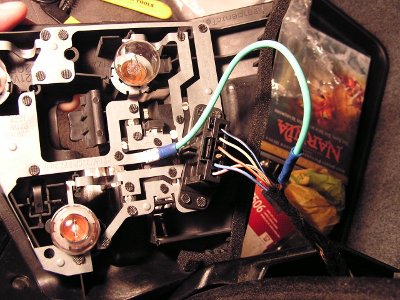
Below is the unit sitting in the trunk and connected to the wire-harness. You’ll have to excuse the visible junk in the trunk—my son is not very particular about his car trunk. As you can see, I have clipped the brown ground lead from the vehicle’s wire harness and connected my green ground wire to it using another blue crimping connector from the connector set above. The crimp tooling and connectors are great to work with; Simple to use, effective, and quick!
Next we snapped the light assembly back into position within the trunk and checked out the lights. Hooray! Everything is now working perfectly. Lights are as bright and snappy as the day the vehicle was purchased. The light warning is no longer appearing at the dash board. My son can now drive his car again! He’s a happy camper and we are not out the $ hundreds it would have probably cost us to deal with the BMW service center.
…As a precautionary measure I checked the left rear light assembly for the same problem. The materials and connectors are the same on the left side, but I did not see any sign of a problem on that side. For now, I decided to leave the left side alone. Perhaps we’ll be dealing with the left side in the future. :)
A few other things we have done at home with this BMW 325i E46 since we purchased it as a used vehicle a few years back:
Changed break shoes and brake wear sensors front and back—pretty easy task and saved us a bundle.
Performed regular oil and filter change.
Fixed a leaking O-ring on the top radiator hose.
Changed serpentine belt on front of the engine—that one was fun—NOT!
Front end alignment—yes we can do that also without the use of any expensive equipment!
Changed the rear drivers-side window drive motor.
Disclaimer:
The information provided here is not a suggestion or endorsement that anyone should attempt to perform the activities shown or described. This information is provided as-is to show how I solved the problem described. Any repairs you make are done at your own risk. The author assumes no responsibility or liability for the actions of others or the results obtained or problems encountered, including loss of any kind, from use of the information on this site.
In other words; You better know what you are doing before trying your own repair work. If you are unsure as to what you are doing, then seek out a qualified mechanic to perform the work.
